Properties (Web)
Adding, editing, and deleting properties (service locations) from the Pool Runs web admin.
Properties (Web)
Adding, editing, and deleting properties from the Pool Runs web admin. For the same flow on the technician mobile app, see Properties (Mobile App).
In Pool Runs, a property is the physical location where you perform service. Pool Runs uses a three-layer hierarchy:
| Layer | What it represents | Example |
|---|---|---|
| Customer | The billable account, contact info, payment method | "Highland Park HOA" |
| Property | A physical address you visit to do work | "1420 Mockingbird Lane, Dallas, TX 75205" |
| Body of Water | The actual pool/spa/fountain you service | "Main Pool" (15,000 gal), "Spa" (550 gal) |
Every customer needs at least one property before you can schedule a stop, log a reading, or invoice. One customer can have many properties. See Multi-Property Account Patterns for HOA, snowbird, rental, and builder workflows.
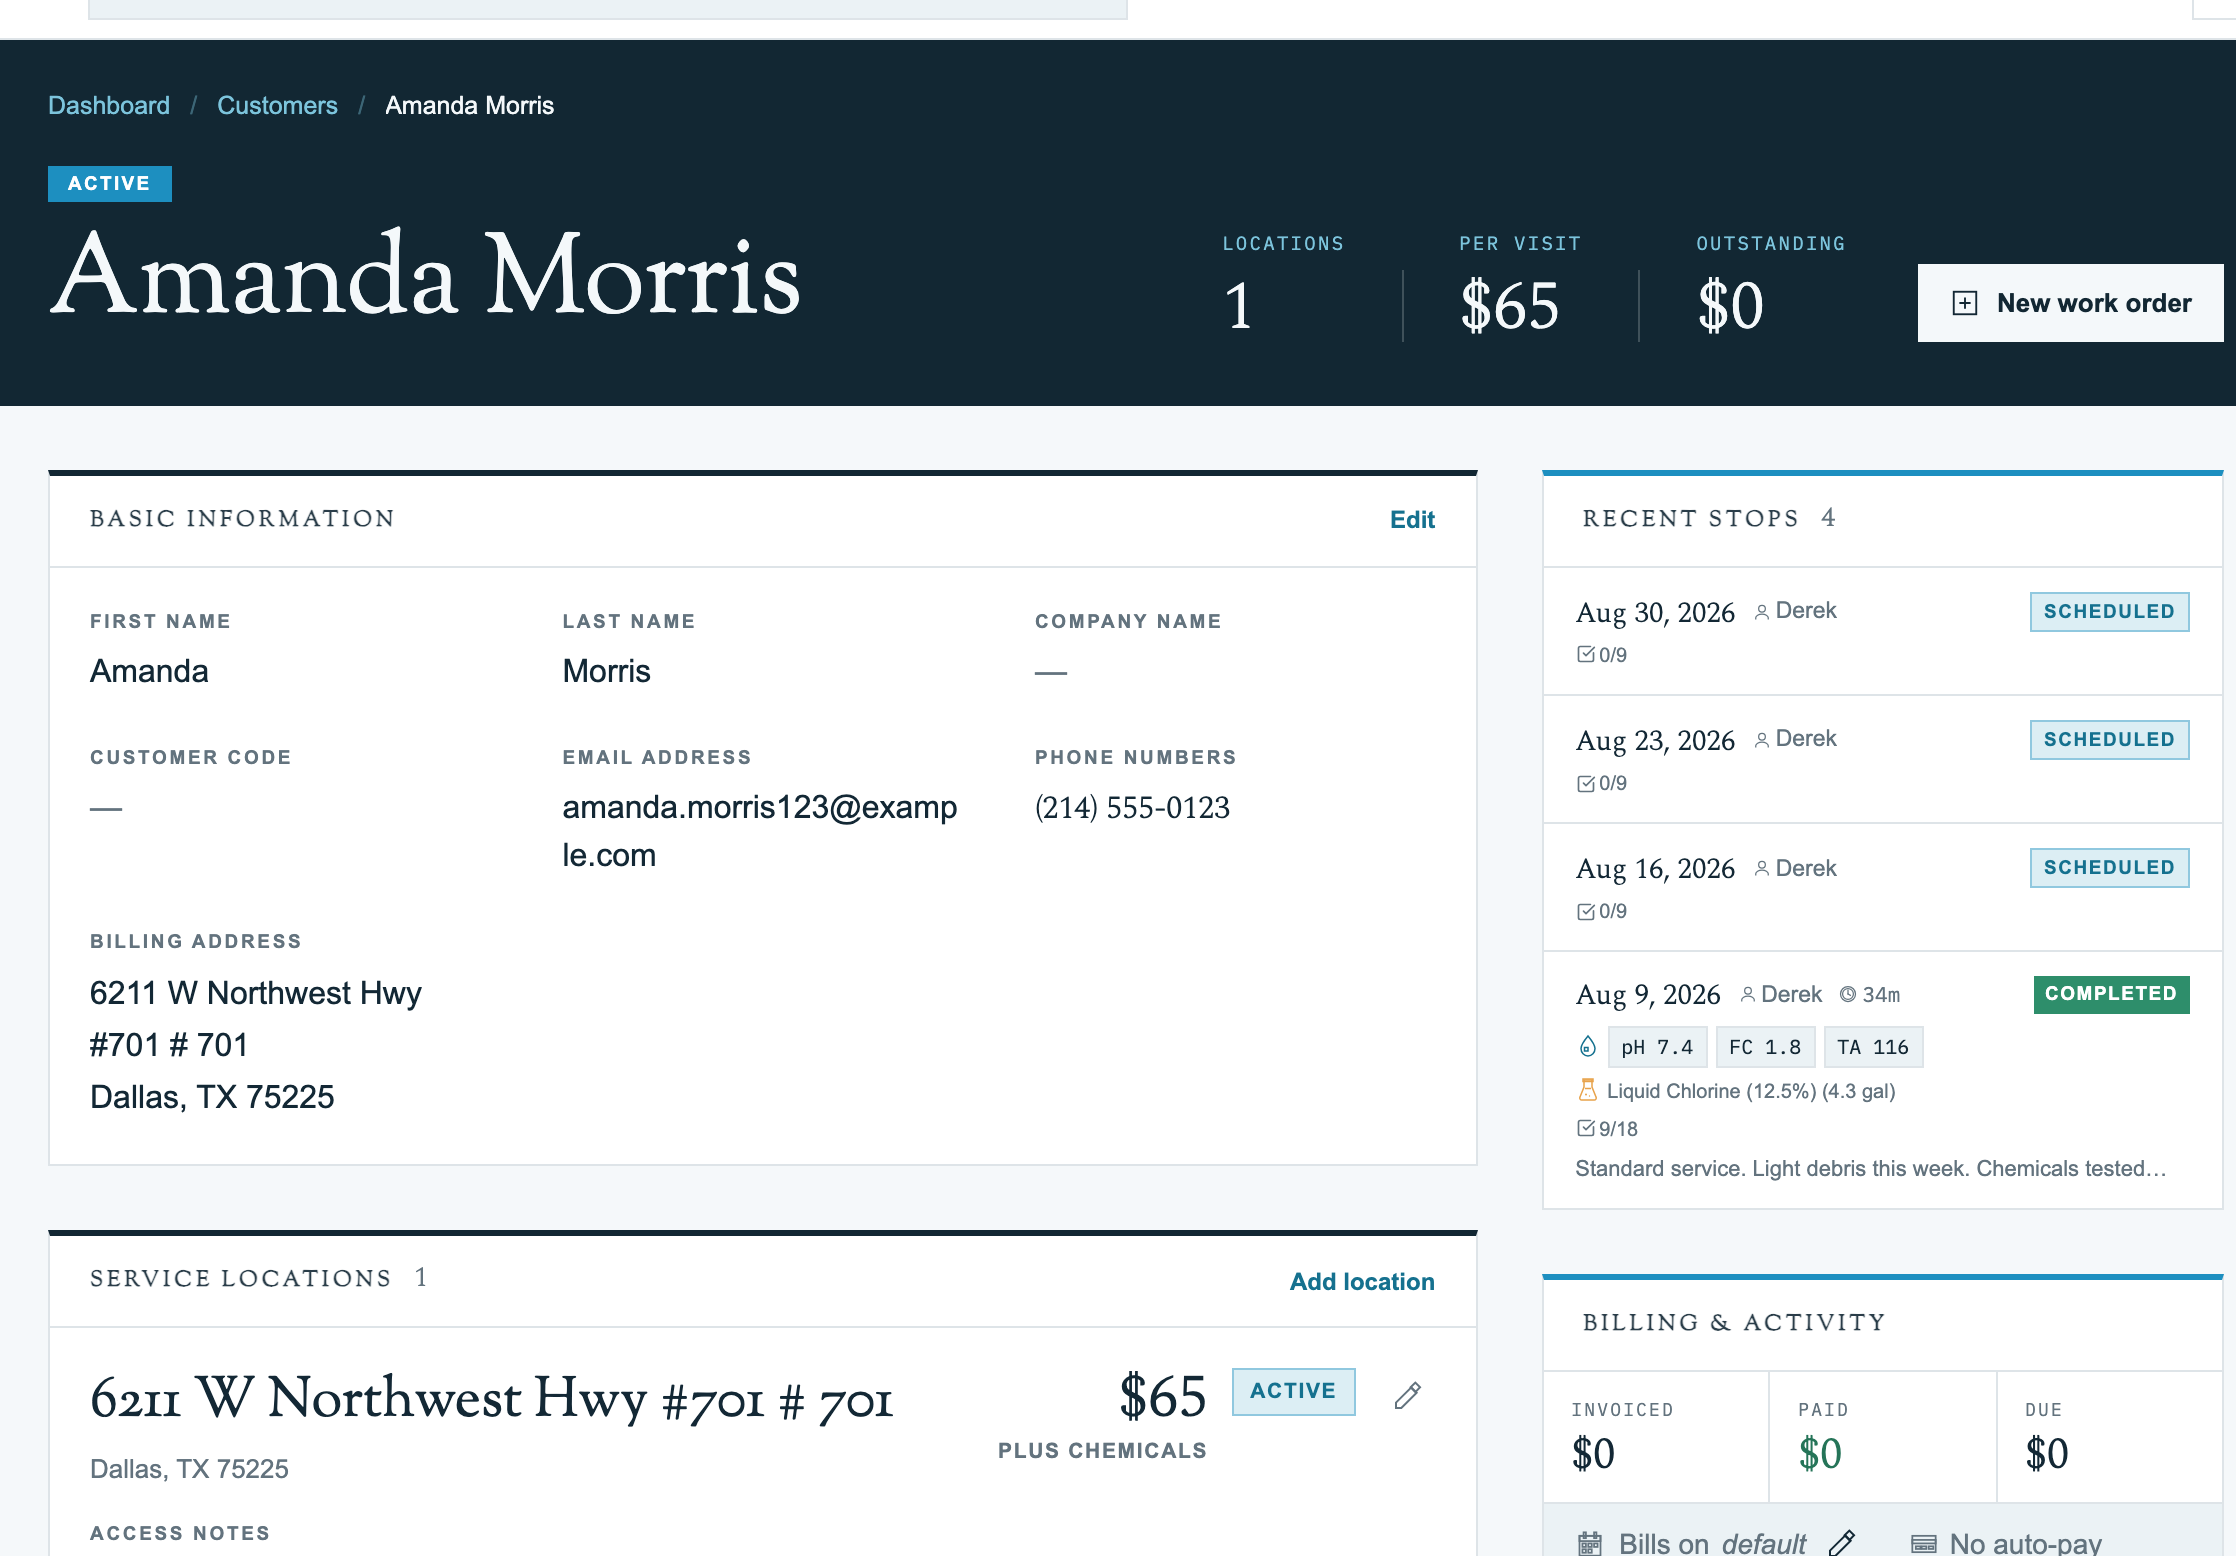
Tip: Pricing lives on the property, not the customer. Two locations on one account can bill at different rates.
Adding a Property
Prerequisites
- A customer record already created. See Add, Edit, or Delete a Customer (Web).
- The full street address of the service location. Google Places autocomplete works best on real, mailable addresses.
- Your service rate and rate type (per stop / per month / plus chemicals) decided.
Step 1: Open the Customer and Add a Location
From the Customers list, click the customer to open their profile. Scroll to the Service Locations card and click Add First Location (or Add Location in the top right if the customer already has one or more properties).
Tip: You'll use this same form to edit the property later. Only Add mode includes the Water Feature section for the first pool or spa.
Step 2: Enter the Property Address
Google Places autocomplete places the address accurately on the map for route optimization. You can fill the address in two ways:
- Search the property address field at the top — start typing and pick a suggestion.
- Click Use Customer's Billing Address if the service address matches the billing address (common for residential accounts).
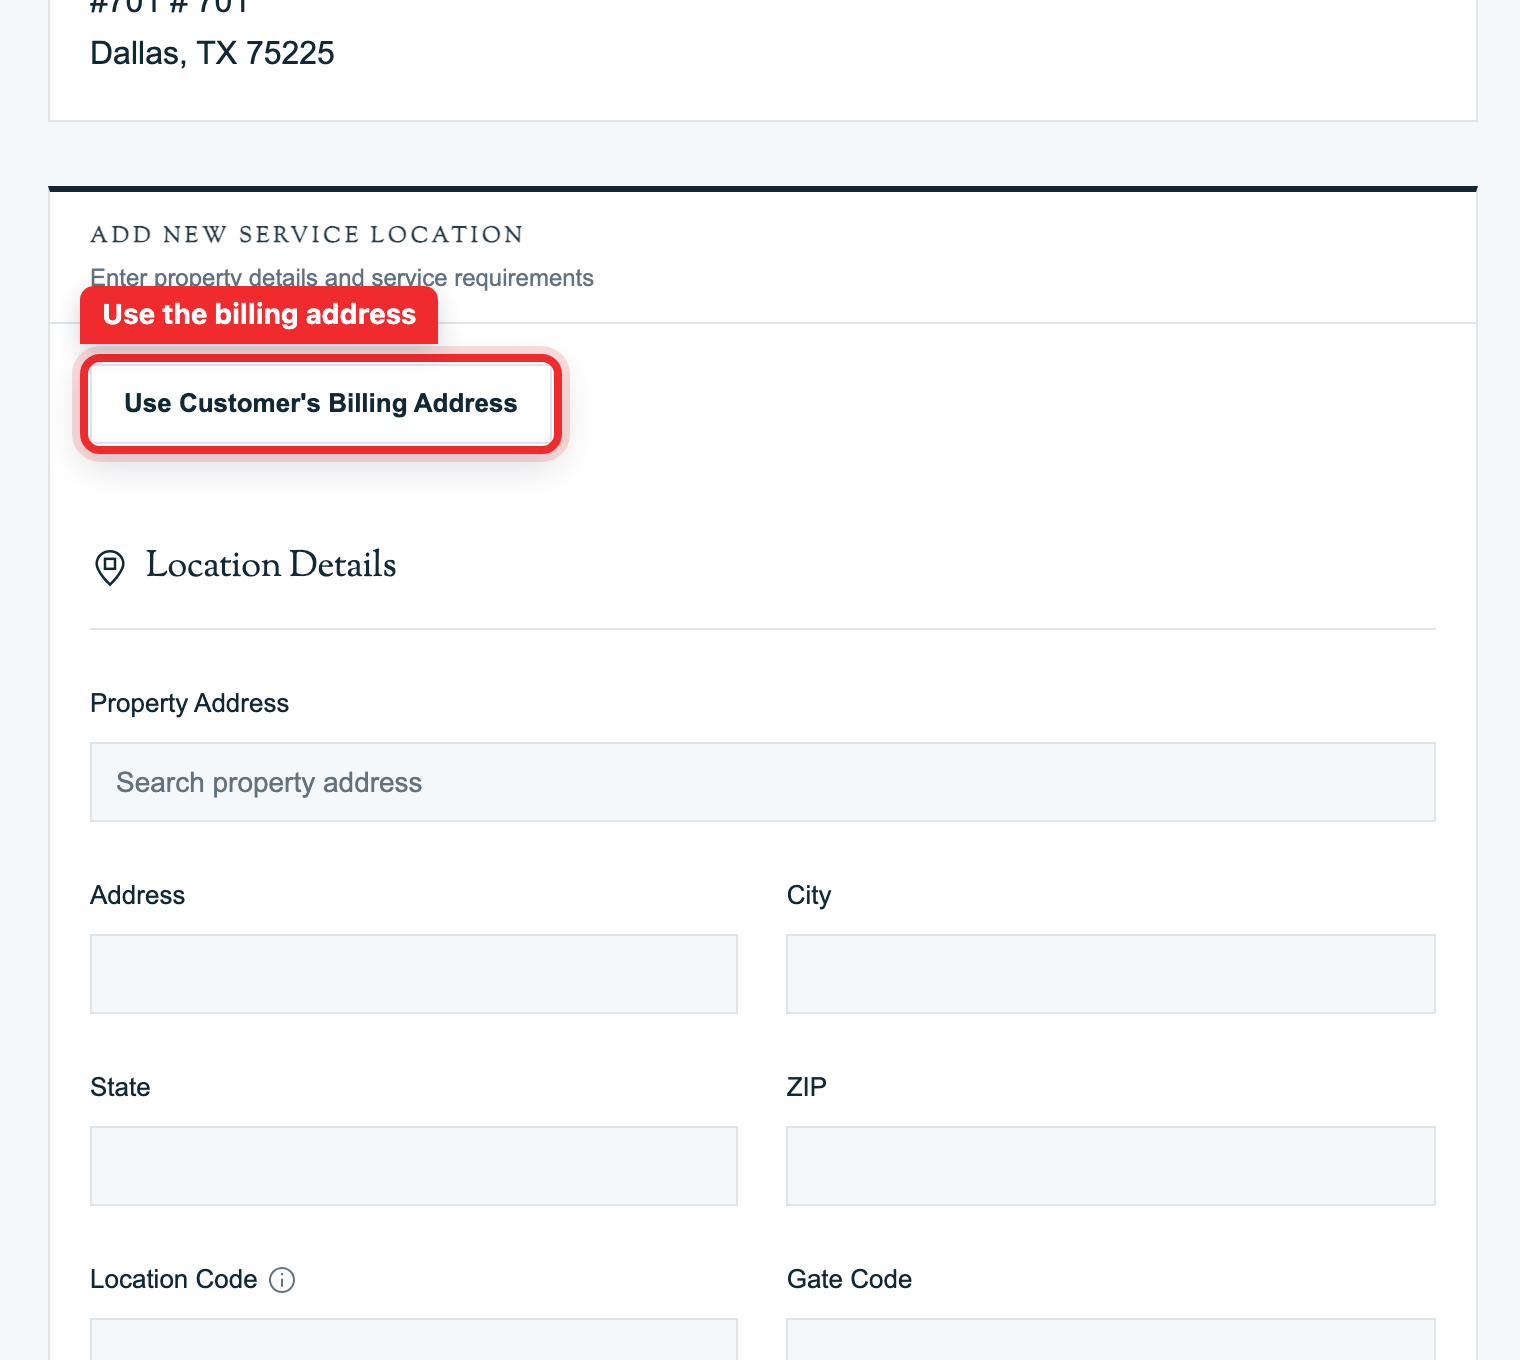
Once a suggestion is selected, the Address, City, State, and ZIP fields auto-fill, and Pool Runs records the latitude and longitude.
Note: If you type the address manually, Pool Runs locates it on the map when you save. If multiple matches exist, a Confirm Address dialog lets you pick the right one.
Step 3: Add Optional Identifiers
| Field | When to use it |
|---|---|
| Location Code | Useful for HOA/commercial accounts with internal property IDs ("Pool #4", "Building B"). Appears alongside the address on route stops. |
| Gate Code | The gate or lockbox code your tech will need. Visible in the mobile app — keep it current. |
Step 4: Fill in Property Details
- Estimated Service Time (minutes). Used by the route builder. Defaults to 30 minutes if blank — set realistically (a small backyard pool is usually 20 min; a big commercial complex 45–60).
- Dog Names. A safety field. The mobile app surfaces this prominently before the tech opens the gate.
Step 5: Capture Access Notes
The Access Notes field is the single most important free-text field on a property. Anything you write here is shown to the tech on their phone before and during the stop.
Example: "Gate is on the left side of the house. Keep gate closed, pool dog runs."
The Location Notes field is for general property info that is not strictly access-related (sun exposure, water source, etc.).
Step 6: Set Pricing and Labor (Admin Only)
If your role can view financial information, you will see a Pricing & Labor section.
| Field | Meaning |
|---|---|
| Service Rate | What you charge the customer for this location. |
| Rate Type | How that rate is applied — see table below. |
| Labor Cost / Labor Cost Type | What you pay the tech. Hidden from the customer. |
Rate Types
| Rate Type | How it works |
|---|---|
| Per Stop (chemicals included) | Charged once per completed visit. 4 visits × $50 = $200/mo. |
| Per Month (flat rate) | One charge per billing period regardless of visit count. |
| Plus Chemicals (itemized) | Per-visit base rate plus an extra line for each chemical dosage logged. |
| Monthly + Chemicals | Flat monthly rate plus itemized chemicals. |
Labor Cost Type has three options, not just a flat amount. One is Percentage of Service Rate, which shows a live dollar preview of the tech's pay as you set the percentage.
Step 7: Add the First Water Feature
The Water Feature section only appears when adding a new property (it is hidden when editing).
- Name — defaults to the type ("Pool", "Spa") but you can rename to "Main Pool", "Kid Spa", "Lobby Fountain", etc.
- Type — Pool, Spa, Hot Tub, Fountain, Pond, Waterfall, Other.
- Volume (gallons) — used later for chemical dosage calculations. Even a rough estimate is better than zero.
Step 8: Save
Click Add Property at the bottom. Pool Runs confirms the address and map location, creates the property and its first body of water, and returns you to the customer profile with the new location listed.
The new property is immediately available for routes, mobile, and invoicing. Stops, readings, and invoices logged against it appear under the customer profile's Recent Stops and Billing Activity cards.
Editing a Property
To edit, go to Customers, click the customer, find the property in the Service Locations card, and click Edit.
The page is the same form you used to create the property, with two differences:
- The Water Feature section is hidden (manage water features from the body-of-water page instead).
- A Delete Property button appears in the bottom-right.
Editing Location Details
Editing the Address fields updates the saved map location when you save. Update the Gate Code immediately when codes rotate, since technicians see it in the field.
Warning: Address changes apply on the next route publish. For large moves (city, not just a typo), check route assignments afterward to confirm the new location still fits its current route.
Editing Pricing & Labor
Adjust the Service Rate and Rate Type at customer renewal. Changes take effect on the next billing cycle — already-issued invoices keep their existing line items.
Tip: If you change pricing mid-billing-period, generate any pending invoices for the old period first. Otherwise the new rate may apply retroactively to a stop you already promised at the old price.
Deleting a Property
A Delete Property button appears in the bottom-right of the edit form. Use it sparingly:
- Confirm there are no upcoming route stops at this property — remove it from any active routes first.
- Confirm there are no open work orders or unpaid invoices that reference it.
- Click Delete Property, then confirm in the dialog.
Warning: Deleting removes scheduled stops and orphans historical service records. There is no "archive property" feature — for seasonal pauses, remove the property from its route instead.
Troubleshooting
- "Address Not Found" dialog after Save: Pool Runs could not match what you typed. Use the search field at the top of the form and pick a suggestion instead of typing manually.
- Confirm Address dialog with multiple suggestions: Your typed address has more than one possible match, which is common with apartments and PO boxes. Pick the correct location for accurate routing.
- "Add Location" button is missing: Your role may not allow property creation. Ask an admin to update your role.
- Pricing section is hidden: Financial visibility is intentionally restricted on technician-only roles.
FAQ
Related Articles
- Multi-Property Account Patterns — HOA, snowbird, short-term rental, and builder workflows.
- Customer Profiles — the parent record that owns properties.
- Bodies of Water — the pools and spas that live on each property.
- Importing Customers — bulk CSV import.
- Route Builder — assigning the new property to a route.
- Invoice Generator — batch billing across properties.
Need help? Check our troubleshooting guide or contact support.